Schedule MongoDB Atlas M20 Clusters and Cut ~70% of Compute Spend (When You Use < 50 Hours/Week)

MongoDB Atlas doesn’t have options like AWS with Savings Plans or Reserved Instances. Atlas offers its own subscription credits instead. That makes scheduling the biggest lever for non‑prod clusters. With CloudAvocado you can schedule MongoDB clusters and drop compute costs by ~70% when clusters are used < 50 hours per week.

Why schedule Atlas now?

  • On‑demand compute adds up: An M20 is $0.20/hour (about $146.72/month if you
    run 24×7; region may vary). MongoDB
  • No similar to AWS SPs/RIs to lower the bill
  • Atlas has its own commits: You can buy Atlas subscription credits (monthly/annual). That’s not the same as AWS Savings Plans/RIs. MongoDB
  • Most dev/test clusters run < 50 hours/week: Matching runtime to working hours eliminates the majority of compute spend.

What Atlas supports natively (and the limits)

Atlas Pause/Resume (UI, CLI, or Admin API) works for M10+ clusters that do not use NVMe, for up to 30 days, and you must let a cluster run 60 minutes after resuming before pausing again. While paused, Atlas charges only for storage(compute and data transfer stop). Flex and Serverless cannot be paused. MongoDB
Why teams still struggle with DIY: You end up wiring cron/Lambda, tracking 30‑day auto‑resume, honoring the 60‑minute run rule, rotating API keys, and remembering which projects/regions are eligible.

How CloudAvocado handles Atlas scheduling

    • Connect Atlas with a scoped API key.
    • Discover clusters across projects/regions (Atlas) alongside your AWS resources in one dashboard.
    • Pick a schedule (e.g., Weekdays 09:00–19:00)
    • Apply by tag or bulk‑select; new clusters inherit the schedule automatically.

Under the hood, CloudAvocado calls the Atlas Admin API for you, re‑pauses clusters after Atlas’ 30‑day auto‑resume.

The math for an M20 used < 50 hours/week

Pattern Hours / month Cost @ $0.20/hr Savings vs 24×7
24×7 (baseline) 720 $144.00
Weekdays always‑on (24h × 5d) ~520 $104.00 28%
Business hours (10h × 5d ≈ 50h/week) ~217 $43.40 ~70%

Notes: Uses 50 h/week × ~4.33 weeks/month ≈ 216–217 h. Storage continues to bill while paused; compute and data transfer do not. MongoDB
Scale that across three M20 dev clusters and you’re saving ~$300/month on compute before any rightsizing.

Gotchas (and how CloudAvocado avoids them)

  • Eligibility: CloudAvocado flags clusters that can’t pause (Flex, Serverless, NVMe, some multi‑region setups). MongoDB
  • 30‑day auto‑resume: It re‑pauses if your schedule still applies. MongoDB
  • 60‑minute cool‑down: It waits the required hour after resume before pausing again. MongoDB
  • Warm‑up time: Search indexes/backups can trigger work after resume, consider that time. MongoDB
  • Commit vs. schedule: If you buy Atlas subscription credits, scheduling prevents you from burning them on idle hours but it won’t retroactively reduce a commitment. MongoDB

Next steps

  • Start a free CloudAvocado trial, connect your Atlas project and AWS accounts, and watch tomorrow’s dashboard reflect real savings.
  • Share this guide with your DBA + FinOps teams; standardize on < 50 hours/week for non‑prod as your default policyi

Need a simple AWS cost optimization solution?

Schedule a free demo with a cloud cost optimization expert

Schedule a demo

How to Schedule AWS EC2 Instances in 5 Minutes (and Save 70% on Your Bill)

Amazon EC2’s pricing means you’re billed for every second an instance is running – even if it’s sitting idle. Most development, testing environments don’t need 24/7 compute even though companies often leave these instances running constantly. This idle time translates to extra cloud spend. If your instances are only used ~10 hours a day on weekdays (50 hours/week), you could save around 70% by shutting them down after hours. Usually dev teams isn’t working 24/7, but dev environments never stops. I want to share options how to schedule AWS EC2, RDS, ECS, EKS.

Why AWS Resource Scheduling Matters More Than Ever

As I mentioned above – most companies use their AWS instances run 24/7. The math is simple but painful: if your team works 40 hours per week, you’re paying for 128 hours of unused compute time.

Here’s what I typically see when auditing AWS accounts:

  • Development environments running 24/7 with no need
  • Test instances that haven’t been accessed in weeks but still running
  • Many test instances was used for a couple days and abandoned after that for weeks

The solution isn’t complex – it’s about aligning resource availability with actual need through scheduling.

Real Cost Impact: AWS Scheduling Examples

Lets look on sample dev environment with numbers:

Scheduling Strategy Instance Type Usage Pattern Monthly Cost Savings vs 24/7
Always On (Baseline) 10 × m6i.xlarge 720 hrs/month $1,382.40
Weekend Shutdown 10 × m6i.xlarge Weekdays 24/7 $921.60 33% ($460.80)
Business Hours 10 × m6i.xlarge 10hrs × 5 days $384.00 72% ($998.40)

*Based on $0.192/hour per m6i.xlarge instance in us-east-1

Traditional Ways to Schedule EC2 (and Their Drawbacks)

Before introducing CloudAvocado solution, it’s worth noting how teams often handle EC2 scheduling using native AWS or DIY methods:

AWS Instance Scheduler: AWS provides a solution (now via Systems Manager Resource Scheduler) to start/stop instances on a schedule You define cron-like schedules and tag instances to follow them.

  • Pros:

    • Effective;  works across multiple account in organization
    • works across multiple account in organization
  • Cons:

    • require non-trivial setup
    • someone need to maintain it
    • limited list of supported services

Custom Scripts or Lambda Functions: Some teams write their own AWS Lambda functions triggered by CloudWatch Events (cron expressions) to stop and start instances.

  • Pros:

    • Effective
    • Gives more flexibility (and can even implement logic like “stop if CPU < 5% for 1 hour”)
  • Cons:

    • someone need to write code and maintain it, ensure that script runs in all target accounts/region

Manual Effort: The simplest (but least scalable) method is manually stopping instances via the AWS Console or CLI. I used this method long time ago.

  • Pros:

    • Effective
    • Free to use
  • Cons:

    • it’s easy to forget about it

Why look for an alternative? These methods either require engineering time to set up and maintain (infrastructure-as-code, scripting) or they rely on humans to click buttons. This is where CloudAvocado comes in – offering a user-friendly UI to automate instance scheduling without any custom scripts<span”>, in a matter of minutes.

Scheduling EC2 Instances in 5 Minutes with CloudAvocado

CloudAvocado is a cloud cost optimization tool focused on AWS. One of its core features is automated scheduling of resources like EC2 (and RDS, etc.) to eliminate paying for idle time. We’ll see how to get started quickly and implement a smart schedule. No deep AWS expertise or coding required – perfect for DevOps engineers who want results fast.

1. Onboard Your AWS Account (No Scripts Needed)

To use CloudAvocado, you first connect it to your AWS environment. The good news: this setup is extremely simple and doesn’t involve running any scripts or agents on your side. CloudAvocado uses a secure cross-account role approach:

  • Sign Up & Connect: Sign up for a CloudAvocado account (a free trial is available). In the onboarding, you’ll be guided to create an AWS IAM Role with a predefined policy that grants CloudAvocado the minimal permissions it needs (like reading EC2 info and toggling start/stop). There’s no manual scripting – just follow the step-by-step instructions either with CloudFormation script or manual.

CloudAvocado immediately discovers your instances (and other resources, like ECS, EKS, RDS, etc.) in that account.

CloudAvocado’s platform is built for multi-account aggregation – you can easily view and schedule instances across dev, staging, and prod accounts all in one place. No more juggling AWS logins or switching regions manually.

2. Visualize Utilization with the Dashboard & Heatmaps

Once connected, CloudAvocado gives you a unified dashboard of your cloud usage and costs. Instead of combing through AWS Cost Explorer or CloudWatch metrics, you get a clear visual overview:

CloudAvocado’s dashboard provides a visual summary of your AWS costs and usage. Imagine merging CostExplorer and CloudWatch The intuitive UI includes charts (even heatmaps) highlighting usage patterns and potential waste. This makes it easy to identify idle periods at a glance.

  • Utilization Heatmaps: CloudAvocado includes visualizations that correlate when your instances are running (and how much they’re utilized). For example, you might see a weekly heatmap showing hours of high vs. low CPU utilization across your instances. These visuals quickly highlight that, say, CPU usage drops to near-zero every day after 7 PM – a strong indicator that the instance could be shut off at that time. By spotting dark “cold” areas on the heatmap (periods of low utilization), you identify scheduling opportunities immediately.
  • Metrics & Recommendations: The platform also presents charts of CPU and memory usage down to an hourly granularity, along with cost analytics. It can even highlight underutilized resources and suggest where you could save This approach helps build confidence that turning off an instance won’t disrupt anyone – you can literally see that it’s idle out-of-hours before you schedule it off.

Overall, with overwhelming amount of data from CloudWatch and CostExplorer – the UI is designed to remove as much noice as possible.

3. Define a Schedule (Idle-Aware Stop Times)

Now comes the core task: creating a schedule that will automatically stop and start your EC2 instances according to your desired timings. In CloudAvocado, this is done through a simple Schedules UI (no cron syntax needed):

  • Choose Off-Hours: Define the days and time ranges when instances should run, and when they should be shut down. For example, you might create a schedule named “Weekdays-9to5” that starts instances at 9:00 AM and stops them at 7:00 PM, Monday through Friday. You can specify time zone as needed. This covers turning them off on weeknights and all weekend.
  • Metric based schedule: A schedule Instead of a blunt stop at exactly 7:00 PM, you can configure an idle timeout after working hours– e.g. “stop if the instance has been idle for 60 minutes after 7:00 PM.”  People tent to work a bit shifted time, especially with remote work. This means if someone is using the instance past 7, the instance won’t be terminated mid-task. It will wait until the CPU drops below a threshold (set per instance, “Idle” is different for different resources) for set duration before shutting down.

This smart scheduling ensures you capture maximum savings without hurting productivity. You avoid the scenario of forgetting to turn off instances (wasting money), and avoid the risk of turning something off while it’s still needed. Everything is configurable in a few clicks.

4. Apply Schedules to Instances (or Automate with Tags)

After defining a schedule, you need to assign it to the target instances:

  • Direct Assignment: In the CloudAvocado Resources view, you can bulk-select the EC2 instances you want to schedule and simply apply your new schedule to them. For example, you might select all instances in the “Dev” environment group and apply the “Weekdays-9to7” schedule in one go. The UI clearly shows which resources have which schedule active.
  • Tag-Based Scheduling: For more convenient automation, CloudAvocado has custom AWS resource. Just assign CloudAvocado schedule tag to resources, with schedule id. This way, whenever a new instance with that tag appears, it will automatically inherit the appropriate schedule.
  • Multi-Account, Multi-Region: All of this works across multiple AWS accounts and regions seamlessly. If you’re a cloud engineer managing workloads for several teams or clients, you can view all their instances in CloudAvocado and apply schedules without having to log into each account separately. This aggregated view and control is a huge time-saver and prevents oversight.

Once a schedule is applied, CloudAvocado’s automation takes over. There’s no need to visit the AWS Console to start or stop instances manually – or to check if the schedule ran. You can always see the current state (running or stopped). And if you ever need to override (e.g. keep an instance running late just one night), you can disable schedule for “X amount of hours”

*  Create Teams and add Users (Optional)

CloudAvocado has role based access control, you can define different roles, assign resources to teams, etc.

Conclusion: Save Costs in Minutes – Give It a Try

Scheduling AWS resources is one of those quick wins in cloud cost optimization: it’s relatively easy to implement and brings significant savings (often on the order of 60–70% for non-prod environments). By using CloudAvocado, you can setup this process in couple minutes – without writing code or managing schedules by hand. As well – consider that it’s not just about EC2, CloudAvocado also supports ECS, EKS, RDS, DocumentDB, SageMaker.  

Need a simple AWS cost optimization solution?

Schedule a free demo with a cloud cost optimization expert Schedule a demo

Updated pricing for Amazon EKS: Extended support explained

Earlier we talked about EKS at a high level in CloudAvocado article about EKS optimization. Here is real-life example: extended support for Amazon EKS. Among many other activities like monitoring cluster metrics, right-sizing nodes, and enabling autoscaling processes, surprisingly, Kubernetes version control is also important. Best practice: update Kubernetes on your EKS clusters to the latest available version once it’s released. Updates usually address security vulnerabilities, performance improvements etc., so it’s really important to check for a new versions once in a while. But not many of us did. However, that is has changed and now we need to pay more attention to it.

On April 1, 2024, Amazon announced general availability of extended support for versions of Kubernetes. It means from now on you can run your EKS clusters for up to 26 months from the date the version becomes available on EKS, instead of 14. Sounds good, however, this update produced a new pricing rule you need to know.

Standard EKS support

Kubernetes gets new features, design updates, and bug fixes with minor versions releases approximately once in four months. We already know that Amazon recommends creating new clusters using the latest version of Kubernetes and updating earlier created clusters to the latest version as well. The only thing you need to remember is that there are two support types now and the price of the cluster depends on it.

Each new Kubernetes version receives standard support for 14 months after being published on Amazon EKS.

Common billing rules are well known. You pay:

  • $0.10 per hour for each Amazon EKS cluster that you create
  • for services you use, as you use them (EKS on AWS using either EC2 you create to run your Kubernetes worker nodes or AWS Fargate)

What happens when it ends?

Amazon EKS

Extended EKS support

Immediately after the standard support term ends, Kubernetes version start receiving Extended support. It lasts for 12 more months. For example, standard support for version 1.23 in Amazon EKS ends on October 11, 2023. Extended support for version 1.23 began on October 12, 2023, and will end on October 11, 2024. It is available in all AWS regions. Exciting news – you don’t need to take any action to receive it – as soon as 14 months pass from the release date, clusters that still run it will be automatically onboarded to the extended support. 

New billing rules:

  • $0.60 (instead of $0.10) per hour for each Amazon EKS cluster that you create
  • for services you use, as you use them (EKS on AWS using either EC2 you create to run your Kubernetes worker nodes or AWS Fargate)

There are no limitations to Kubernetes in Amazon EKS extended support, so it won’t turn off or weaken your clusters’ capabilities. Clusters running Kubernetes versions released more than 26 months ago (14 months of standard support + 12 months of extended support) are upgraded to the oldest currently supported extended version automatically. It’s important to remember you still need to update cluster add-ons and Amazon EC2 nodes manually after the automatic control plane update, 

You can avoid auto-enrolling in extended support by upgrading your cluster to a Kubernetes version that’s still in standard support.

Standard vs extended EKS support: cost comparison

The price difference may not seem big at first sight. But let me prove that it’s worth your attention, especially if you use a lot of EKS. Simple calculations of monthly and full price differences between standard and extended support for one and more clusters: 

Clusters qty Standard support monthly cost

Extended support

monthly cost

Potential waste if not updated
1 month 12 month (full length)
1 730h * $0.1 = $73.0 730h * $0.6 = $438.0 $73.0 – $438.0 = – $365.0 – $4 380.0
10 $730.0 $4 380.0 – $3 650.0 – $43 800.0
30 $2 190.0 $13 140.0 – $10 950.0 – $131 400.0

As you can see, updating your clusters before they run into extended support can save you from spending an excessive $365 on each EKS cluster monthly! Real-life example: one of CloudAvocado’s users has 36 clusters, so in addition to monthly payment for included resources his extended support might have cost him 36 * $365.0 = $13 140.0 without any previous changes in the infrastructure. It’s good we were there to help.

You may assume it may be a big deal only for big organizations. However, I recommend setting up reminders regularly and updating Kubernetes versions before they run into extended support. Even if there are only a few clusters you can prevent unpredicted waste and keep your budget within limits.

Short FAQ

Will I get a notification when standard support is ending for Kubernetes version on my Amazon EKS? 

Yes, AmazonEKS sends a notification through the AWS Health Dashboard approximately 60 days before it ends

Are there any limitations to Kubernetes in extended support?

No, there are not.

Is AWS support available for clusters in extended support?

All clusters continue to have access to technical support from AWS.

Are there any limitations to patches for non-Kubernetes components in extended support?

Extended support will only provide support for AWS published Amazon EKS optimization AMIs for Amazon Linux, Bottlerocket, and Windows at all times. This means, you will potentially have newer components (such as OS or kernel) on your Amazon EKS optimized AMI while using Extended Support. 

Where can I update my Amazon EKS?  

Use this guide: Update existing cluster to new Kubernetes version

Does CloudAvocado help manage versions of EKS?

Yes, you’ll receive notifications about upcoming extended support while using the app and to your email to update them beforehand.

Follow my LinkedIn to learn more about interesting AWS updates that can help you avoid situations similar to those described above or book a Calendly meeting with me if you have questions about your AWS.

The Importance of Scheduling EC2 Instances on AWS: Beyond Cost to a Greener Future

EC2 scheduling is worth mentioning whenever we start talking about AWS cost optimization or carbon emissions. The reason is simple. Its not a secret that services like AWS’s Elastic Compute Cloud (EC2), has transformed the way businesses operate and became widely used resource for more than 1 million of users. But, with these advancements comes a responsibility to ensure that we’re using these resources wisely, especially for economic and environmental reasons.

Why EC2 scheduling is important?

To put it into perspective, think about your daily commute to work. Once you’ve parked your car, would you leave the engine running all day? Even if there were a hefty discount on fuel, would the cost savings justify the waste? Beyond the obvious financial folly, think about the unnecessary emissions and the depletion of a non-renewable resource.

In much the same way, leaving EC2 instances running when not in use, even if costs are managed, isn’t just wasteful — it’s environmentally irresponsible.

The Green Energy Argument

Many cloud providers, including AWS, are making commendable strides toward powering their massive data centers with renewable energy. On the surface, one might argue that if the power comes from green sources, then the environmental concern is negated. However, this view misses a crucial point.

Even if our cloud resources are powered by 100% green energy, there’s a cap on how much of this renewable energy is available at any given time. Every watt of green energy used to power idle EC2 instances is a watt that could have been used elsewhere.

Thus, by reducing our cloud resource consumption, we’re effectively freeing up green energy for use in other areas, accelerating the world’s transition to sustainable energy sources.

CO2 Emissions VS EC2 Scheduling

While it’s true that data centers powered by green energy significantly reduce their carbon footprint, our global transition to renewables is still in progress. Until that 100% green energy future is realized, every idle EC2 instance contributes to carbon emissions somewhere in the supply chain. Efficient usage of resources means reducing this footprint.

Efficient Cloud Management: A Broader Perspective

Adopting a sustainable approach to cloud computing extends beyond EC2:

  • Development Environments: These rarely need 24/7 uptime. Scheduling downtimes during off-hours can lead to substantial energy savings.
  • RDS: rarely stopped on development environments.
  • Batch Processing: If tasks run during specific hours, ensure instances are active only when needed.
  • Scalable Systems: AWS’s auto-scaling can match demand, ensuring you’re not over-provisioning resources.

Conclusion

The transformative potential of cloud computing is boundless. However, as we venture deeper into this digital age, it’s paramount that our steps are taken with consideration for our planet.

EC2 scheduling and adopting a mindful approach to resource usage is more than just an economic strategy — it’s a pledge toward a sustainable future. The less energy we consume in the cloud, the more renewable energy there is available to make a difference elsewhere. The next time you look at your EC2 dashboard, remember: it’s not just about the cost, but also the broader impact. Every instance, every watt, every decision counts. 

Top tools for AWS cloud cost optimization

Computing resources and business opportunities provided by cloud vendors like AWS are endless.  Amazon services can skyrocket your business growth and profitability. Yet, as any other system in the growing business, your AWS needs to be managed efficiently and optimized over time to improve productivity and cut expenses. Cloud computing has a dedicated set of practices for that goal, which is called cloud cost optimization. 

With the growth of cloud-based businesses and cloud consumption boost, the demand for cloud cost optimization tools is increasing. According to The Cloud Cost Management and Optimization Market Report for 2022-2029 companies like Harness, ParkMyCloud (Turbonomic), Virtana Optimize, Nomad, Kaseya Unigma, CloudZero, Flexera as well as many others have grown much in the past few years.  As the niche is growing and full of options, it may be difficult to choose the perfect AWS cloud cost optimization tool among all the available solutions. 

The main question is whether native AWS tools meet your needs, or whether you need a third-party tool. In this article, we’re going to tell you about both options based on the capabilities that are considered critical for cloud cost optimization.

Key cloud cost optimization capabilities

So which capabilities are crucial for cloud cost optimization? Here is the list: 

  • tagging
  • cost and utilization analytics
  • resource scheduling 
  • and of course, alerts for specific events or anomalies that can cause waste, if not managed properly (e.g. idle and overprovisioned resources)

These capabilities are key to efficient cloud cost management and there are several vendors currently available on the market that more or less cover all of these – including native AWS cost optimization tools. 

Native and third party cost optimization tools

There are many AWS cloud cost optimization tools to explore and allocate costs, as well as track and analyze cloud performance and resource utilization. While native tools seem like a natural choice, many companies find them insufficient for their business needs, or simply too cumbersome due to the need to pull data from multiple AWS tools to see the whole picture. In this case, businesses start looking for more robust and scalable all-in-one solutions.

Scheduling

Fact  – turning off your non-production instances on weekends and during non-business hours (e.g. 6pm-9am) can save you up to 70% of their cost. If not managed properly, your resources will waste a lot of your budget. So you need to schedule your test and development environments by setting AWS Instance Scheduler that will stop your  EC2 and Amazon RDS according to the provided timetable.

Skeddly is a valuable third-party tool designed to gain control over your expenses by efficiently managing the start and stop times of instances and virtual machines, helping you optimize resource usage and reduce costs. You can automate your backups and snapshots for instances, virtual machines, disks, and databases, while also removing outdated snapshots to minimize storage expenses. It also provides comprehensive IT automation capabilities, supporting a wide range of services like Amazon EC2, RDS and more. 

skeddly screenshot

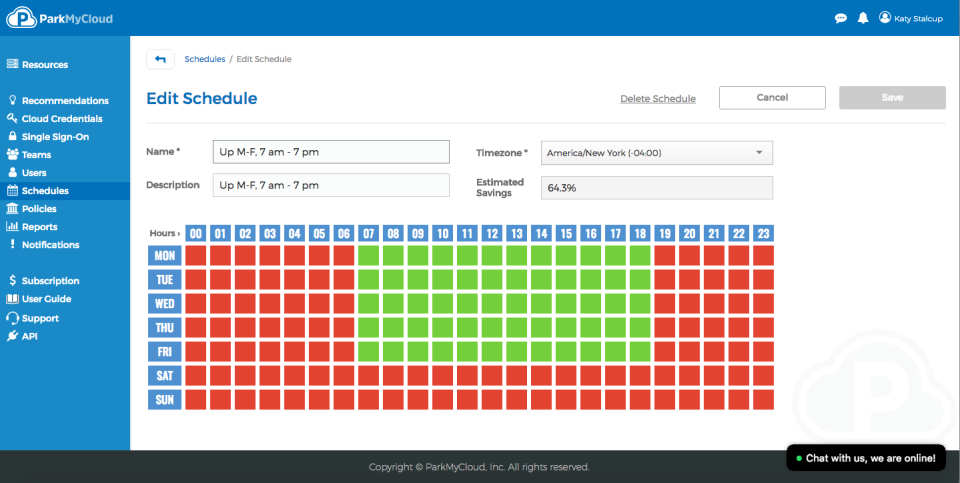
Lots of cloud users can tell a lot about their positive experience with third party platform that has recommended itself as one of the top cloud cost management tools – ParkMyCloud (Turbonomic, recently acquired by IBM). Its so-called Parking Schedule Management was created to add timetables and assign them to required resources in order to use and pay for resources only when you need them.

parkmycloud screenshot

As ParkMyCloud is no longer supported, you might want to know that there is another solution of this kind called CloudAvocado. Its Scheduling capabilities are similar, and additionally, it enables tagging and utilization analytics in your environment to make cost management even more efficient.

cloudavocado aws scheduling screenshot

AWS tagging tools

Tagging is required for the allocation of your cloud costs. Cloud cost allocation is an activity that allows you to connect your AWS bill to specific parts of your product, features or organizational units. The process is straightforward – you assign tags as metadata to all resources to get required reports, analytics and insights per required cost object. Even previously mentioned Scheduling can become quite challenging without proper tagging, as you won’t be able to identify your non-production instances.

Native AWS tools that can help you add and manage your resources’ tags are Tag Editor and AWS Config Managed Rules. Some third-party platforms can also provide you with this functionality, however, you need to be sure the tool can work with your resources across all your accounts. This enables proper tagging across all your regions, projects, etc. and results in accurate and consistent cost allocation.

CloudAvocado works well for tagging also and can also help you to track your tagging progress and display all untagged resources.

untagged resources filter screenshot

Cost and utilization analytics

Your workload needs to be revisioned on a regular basis to detect under- or overprovisioned resources. The former occurs when the capacity of an instance is lower than the demand. It can cause productivity issues within the apps you develop. The latter can cause your cost to be wasted as demand is lower than the instance capacity. It means you can potentially save your budget by replacing it with smaller and cheaper instance/s. The process of matching your capacity to the demand at the lowest possible cost without sacrificing reliability is called rightsizing – and it’s one of the most critical yet complicated tasks in cloud optimization.  AWS provides the following tools to perform this task:

  • AWS Cost Explorer allows you to see patterns in AWS spending over time, project future costs, identify areas that may require your attention. You also should use it for detecting and deleting idle EC2 instances, Amazon RDS instances, Load Balancers and unassociated Elastic IP addresses.
  • AWS Cost and Usage Report provides you with data files that contain your detailed hourly AWS usage across accounts
  • AWS Compute Optimizer helps avoid overprovisioning and underprovisioning using utilization data for some AWS resources (EC2, EBS, ECS), services on AWS Fargate and AWS Lambda functions.
  • Amazon CloudWatch collects and tracks metrics
  • Amazon S3 Analytics – automated analysis and visualization of Amazon S3 storage patterns for cost-efficient tier management of your storage; you also can automate data lifecycle management with Amazon S3 Intelligent-Tiering and reduce Amazon S3 storage cost by identifying cost optimization opportunities with Amazon S3 Storage Lens.

screenshot with bar chart

In the case of third-party tools, some of them cover all the native AWS capabilities mentioned above in a single UI.  

For example, CloudAvocado can easily calculate your current monthly expenses, projected monthly cost and provide you with hourly CPU utilization breakdown for any instance, cluster or autoscaling group. AWS cost and utilization analytics are presented in dashboards and reports to help you make data driven decisions on scaling your workload according to the demand.

cloudavocado dashboard screenshot

Recommendations and alerts for events

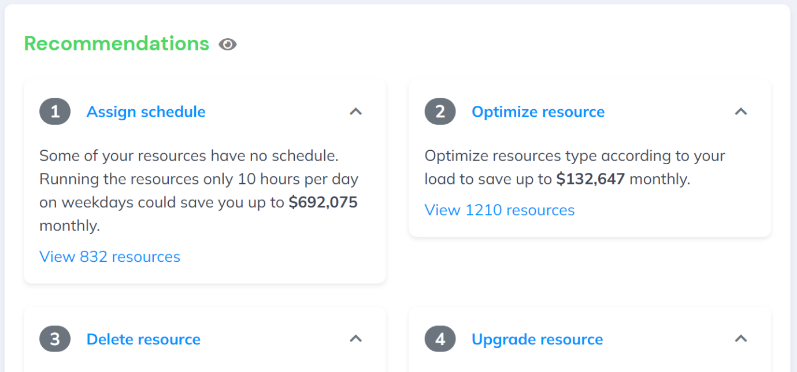
Cloud cost optimization tools analyze your cloud usage and spending patterns to identify potential cost-saving opportunities. By providing recommendations, these tools help you react proactively to reduce unnecessary expenses, optimize resource allocation, and eliminate wasteful spending. This can lead to significant cost savings over time. 

AWS Trusted Advisor gathers potential areas for optimization for your workload and AWS Budgets triggers alerts when cost or usage exceeds (or is forecasted to exceed) a budgeted amount.

Among many other mentioned functionalities, CloudAvocado has built-in recommendations that highlight different cases of unoptimized usage: idle, unscheduled, untagged resources and resources that produce waste due to over-provisioning.

recommendations screenshot

The verdict

Effective cloud cost optimization is essential for maximizing profitability. Since choosing the right tool can be challenging due to the variety of options available, it’s important to focus on the critical capabilities required for AWS cost optimization first. Look for cost allocation, resource scheduling, and alerts for identifying wasteful spending, and always remember that cost optimization is an ongoing process. 

To get more information about AWS cloud cost optimization tools usage read our article cloud cost optimization checklist.

Or simply sign up for a free CloudAvocado trial to start your AWS cost optimization: get analytics on your AWS spendings, efficiency, and potential savings.